Thursday, November 11, 2021

 Two Birds, One Stone

This skirt is my response to two challenges: 

Slow sewist that I am, I did not finish it in time to enter it in the Threads Challenge. However,  I will use the Threads Challenge questions to organize this post.

Inspiration - Two Birds

Literary Sewing Circle

For the Fall 2021 Literary Sewing Circle, participants read The Sun Down Motel by Simone St. James and made something - anything - inspired by the book. The book follows two story lines separated by 35 years and involves mysterious disappearances, ghostly hauntings, and presumed murders. One of the protagonists, Viv, is running away from home and on her way to New York City to pursue an acting career in the fall of 1982 when she lands in the small town of Fell, NY, and takes a night job at The Sun Down Motel, a creepily haunted roadside motel that has long since missed its opportunity for financial success. As I read, the theme of disappearance struck me and I determined to make a skirt to echo that theme.

Threads Runway Sewn Your Way Runway Challenge

The challenge was to interpret a runway look, make it your own, and discuss the challenges and rewards of the project. I recalled seeing a Chanel suit with deconstructed tweed that seemed to disappear, and I found it at Vogue.com in its review of the 2003 Spring Couture season. 
This is the suit, Look 10, Chanel Spring 2003 Couture. The embroiderers at Lesage deconstructed the tweed and attached it to English net. It looks like the fabric disappears before your eyes. Image from Vogue Runway. . Accessed 11/11/2021 from https://www.vogue.com/fashion-shows/spring-2003-couture/chanel#review
This is Look 6 from the same show. Image from Vogue Runway.  Accessed 11/11/2021 from https://www.vogue.com/fashion-shows/spring-2003-couture/chanel#review

I made these looks my own by simplifying the garment to make it something I could wear every day.  I also used a fabric with a Chanel-like texture and a combination of surface manipulation and machine techniques.


Patterns and Fabric

My skirt pattern is based on the Fashion Sewing Group pencil skirt 1964 (now out of print), fitted to my tilted waist and high hip using Sarah Veblen's fitting techniques of horizontal balance lines and draping to fit. Sarah draped a yoke on me to accommodate my particular shape, resulting in a balanced, level hem every time. 

All fabrics are from my stash. The face fabric is a woolen check with a very course weave, purchased from Nancy Erickson of the Fashion Sewing Group. I liked the way the marled yarns seem to disappear: Now you see me, now you don't! It is backed with black power net and the trim is a sequined mesh from Joann Fabrics, left over from a previous project. It is lined with a Bemberg rayon.

Trim

First, I fringed the bottom 4 inches of a length of the wool. Next, I laid out the skirt patterns with the hem edge at the bottom of the fringe. Then, I cut the yoke pieces on the bias. 

I basted the wool to the power net and serge-finished the edges. The yoke pieces were interfaced with a weft-insertion fusible.

To reinforce the disappearing effect, I cut warp yarns and pulled them out, using a crochet hook to isolate the yarns I wanted to remove.

Then I wove the sequined net in place of the removed warp yarns, weaving the strips under the white yarns. I learned that the net strips needed to be just narrower than width of the opening; if  wider, they would fold over and hide the sequins. Chopsticks helped to stabilize the mesh.

I used a crochet hook to spread out the mesh where needed.

There are a few rows of with weft removed. These wrap around to the back of the skirt.

Machine stitching lines stabilize the weave where weft has been removed.

The power mesh has been cut away from the fringe. Weft has been removed  three checks above the line where the fringe begins. 

From inside.

Challenges and Rewards

Early in the process, I realized that I did not have the nerve, the time, or the skill to completely deconstruct the fabric as in the pink Chanel suit. I compromised by working slowly, testing ideas on a scrap, and stabilizing the fabric with machine stitching. Working with the sequined mesh was fiddly, but ultimately very satisfying to learn how to work with it.  The power mesh is more opaque than I expected, and I wonder how a lighter, softer mesh would have worked.

It was especially fun to think about how to style this outfit.  I want a skirt I can wear for everyday life, not a super-fancy designer garment. Several looks in Lagerfelds' 2017 Resort collection for Chanel include travel tee shirts. Viv was on her way to New York when she stopped at The Sun Down Motel; the I HEART NY tee shirt fit the bill. Several of the characters in the novel wear stretched-out hoodies, so I looked for one at my local thrift stores.

This was a big and ultimately very satisfying project. I took breaks from it to shop for vintage tee shirts and watch old movies (E.T. played at the second-run theatre in Fell during the fall of 1982). I'm really grateful for the community of innovative sewists who share so freely on the Web!

Friday, September 3, 2021

September 2021 Mini Wardrobe


Having just retired, my current sewing plans include some exploration into retirement style. The fabrics above are for a mini-wardrobe, which I plan to enter in Pattern Review's current mini-wardrobe contest. Contest entries include two bottoms and three tops, and all tops must coordinate with both bottoms. From left to right: Slate gray jersey, rayon blue heather jersey, "Kandinsky revisited" drapey pebble crepe woven polyester, polyester mini stripe, white cotton poly interlock knit and white cotton bottom-weight twill. The whites are more pure white than the picture indicates.

At this time, my sewing plan includes:

3 tops from Pamela's Patterns Perfect T-Shirt, with self-drafted modifications of each
1 skirt (self drafted) 
1 jeans-style pants from Fit for Art's "Eureka! Pants that Fit."

Sunday, November 17, 2013

My Sewing Year

Something Old, Something New!  Lace design on dress combines appliques of new lace and lace taken from my own wedding dress, made in 1982 using materials purchased in NYC garment district.  Lace on the veil is from the hem of my wedding dress.      Portrait photography by Rebecca Keeling on location in Colonial Williamsburg.


Something Blue! Dan Post Blue Bird Boots.  Vintage pearl jewelry with sapphire clasps, gift from grandmother. Flowers by Williamsburg Floral, Williamsburg, Va.  Portrait photography by Rebecca Keeling on location in Colonial Williamsburg.
Ruffles consist of 10 yards of organza, cut on the bias, gathered and attached in rosettes and multiple rows to a base layer of point d'esprit .  Additional ruffles made with tulle. Ruffle layer attached to completed lace over-skirt. Portrait photography by Rebecca Keeling on location in Colonial Williamsburg.               

A year ago I began my journey to create my daughter's gown for her wedding on November 16, 2013.  Here it is!

Steps and timeline:

December
Bride-to-be tries on dresses and identifies design elements she likes
Select patterns to  create desired design
Take lace off old wedding dress and wash
Dye test samples with tea, ivory dye, and  coffee

January
Make muslin  of corset and dress for fit and design lines
Make samples of ruffles

February
First fitting. Make second muslins.

March
Purchase fabric, lace
Make samples of ruffles
Make second muslins

April
Make boned corset muslin and petticoat
Second fitting
Adjust fit of corset, make corset
Attach petticoat to corset
Adjust fit on muslin, cut muslin apart to use as pattern pieces
Examine inspiration dress to determine materials and technique for ruffles.  Select materials and technique (note:  should have examined inspiration dress first!)
Purchase organza for ruffles

May
Cut and hand-baste satin bodice and under-dress and taffeta lining
Third fitting:  Need to do over bodice. Mark hemline
Stitch skirt seams

June
(little to no activity  because of travel and family matters)


July
Make veil 
Make bodice
Stitch seams on skirt and lining,  baste skirt to bodice
Cut net over-skirt
Make narrow seams  on net overlayPlace lace appliques on skirt, baste
Fourth fitting:  Approve placement of lace. Bodice is still not right.  Purchase bra, start over on bodice (Note: should have bought all undergarments first!)
Cut tulle and organza for ruffles. Gather

August
Attach net overlay to bodice, place lace appliques, fell-stitch in place
Attach bodice to corset 
Order buttons
Hem satin skirt with horsehair braid  and attach lining to skirt at hem (4 rows of hand-stitching)
Make ruffles

September- Oct 5
Fell-stitch appliques on front skirt (DD appliqued lace on back)
Make ruffles
Sew side seams on net overskirt
Attach ruffle layer to lace overskirt
Place lace appliques to hide skirt seams, fell-stitch
Sew 45 buttons down center back of dress
Attach bodice to skirt by hand, using back stitch
Line bodice
Attach skirt lining to bodice-skirt seam
Make and attach button loops
Fifth fitting (two days before portrait appointment):  adjust fit by slicing net skirt and overlapping lace appliques.  Add additional appliques to side front seams.  Add one additional organza rosette for balance.
Sew 25-26 buttons, hook and eye
Make and attach tie

November
Attach 3 sets of bustling ribbons to satin skirt
Attach 9 sets of bustling hooks and thread loops to lace overskirt
Finish stitching lining into place

DONE!  Let the celebration begin!

Monday, October 25, 2010

Twintime

Note styling differences: slacks vs. dress, bright vs. dark, sleeve length, open vs. buttoned, accessories. . .

Note what is the same: length of jacket! hair cut! glasses!

Tuesday, October 19, 2010

Jacket with Red Dress

I made a red wool gabardine dress to go with the jacket. (S3673, a vintage pattern, TNT).

Finished First, Posted Last!


I finished the jacket several weeks ago, but wanted to give Maggie a chance to get hers done before I posted. Here is the completed shell, with precious little hand-stitching. I have an inflamed tendon sheath in my thumb (tenosynovitis), so hand stitching is much less enjoyable for me than it is for Maggie. Truth be told, she has always done much better than me at precision work of any kind . . .I'm such a slacker !

Monday, October 18, 2010

Details

I enjoy hand-sewing, so I made time for the details. The cuffs have working buttonholes, so I lined the vent (top). This was not an easy task, since I didn't do it until after I had set in the sleeve.

The handworked buttonholes were incredibly time consuming but satisfying. It will take me another project or two to get the hang of it, but I'm slowly but surely learning how to keep them from looking like little caterpillars--i.e., too wide and too dense.

I bought the chain for this project several years ago. Because the jacket is underlined and interfaced, I wasn't sure it needed the chain's weight to hang well. But I like the sparkle, and it really does make a difference in the jacket's wearability.

Finished!


I got a sneak peak at Mary's jacket last month. Her crochet trim is simply fabulous, and it made my idea for trim look cheap by comparison. The other big problem was that I couldn't imagine being able to dress my jacket down. It was going to be mostly a dress-up kind of jacket, for which I have little use. This baby's gotta go with jeans!

Finally, a photo of a fringed Chanel jacket in this month's Harpers Bazaar made me rethink my aversion to fringe. After a couple of experiments, I settled on controlled craziness. A one-quarter-inch black petersham ribbon defines the front and pocket edges, while the fringe is made from a 1 1/2 inch wide bias strip that's been gathered in the center and then folded in half. No fringe on the cuff edges--it ruined the lean line, and I could just imagine getting it filled with chalk dust.

Monday, September 20, 2010

Muslin Take 2

If at first you don't succeed. . . I recut the bodice after making an fba and reshaping the neckline by lowering and widening it just one-half inch. Voila! The shape is back. The shoulder pads are too thick--that's an easy fix. The photos make it pretty obvious that the 2-pocket option is the way to go.

Saturday, September 18, 2010

Maggie's Muslin Misery

The muslin is mildly discouraging. It fits perfectly--except in the bust. I need to adjust for only one cup size, but my first attempt ruined the very slight hourglass shaping and left me with a perfectly boxy, ugly rectangle, not to mention other wrinkles and gaps. Sigh.

Even if I could get the fit right, the muslin calls attention to more important design issues. The biggest problem? The jacket's jewel neckline doesn't do anything for me. I'm going to try making the neckline slightly more of an oval framing the collarbone. Still, I wonder if that's enough. Mary's choice of a v-neckline may be the best way to break up the strong horizontal lines of the fabric.

The other design question: can my short torso handle four welt pockets, or would it be more flattering to have just two?

Taking the time to assess the fit and design at the muslin stage is luxury I may not be able to afford. I may rue the day I mocked Mary's TNT!

Wednesday, September 15, 2010

Maggie's Trim


The last big difference: no crochet hook for me! Can't imagine sitting down long enough to learn how. Knitting's no good either. So. . . at emmaonesock I found a lovely soutache bold enough to stand up to the tweed. At Digs, a totally cool shop in downtown Northfield MN, I found vintage rayon ribbon woven on the bias. After weaving the ribbon through the soutache, I embellished it with french knots (Mary says she'd leave off the knots. That's another difference: I'm buttoned down, she isn't). Here's how the trim looks with the fabric.

Mary's Trim -- Crochet


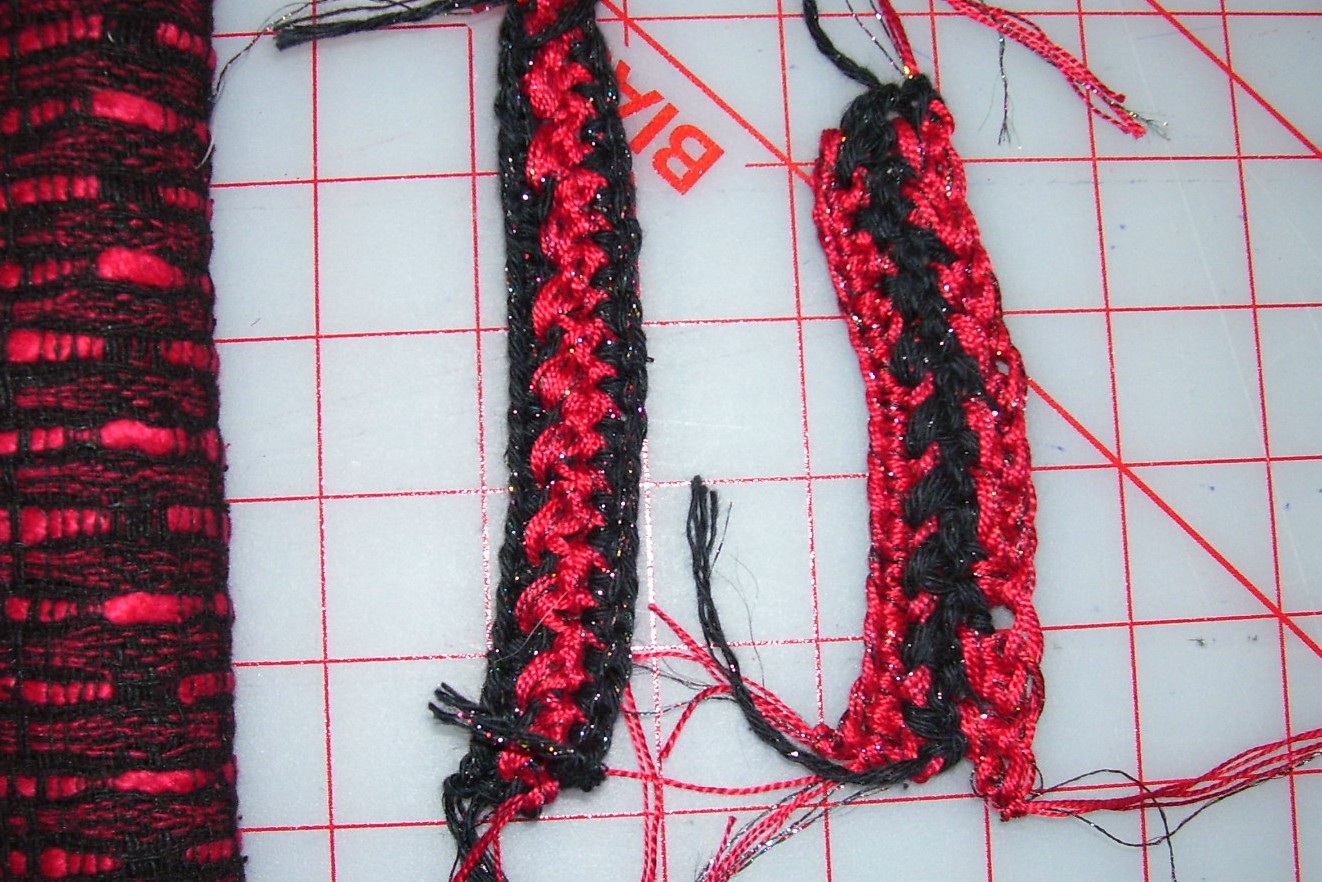
I tried a couple of different patterns, and several trims and yarns. I finally settled on a variation of Bonnie Triola's two-color trim design, which she demonstrated on Stitcher's Guild on July 7, 2010. I changed it slightly. Row 1 and Row 3 are single crochet. I like the one on the left best.

Materials:

Black - DMC Senso Metallics (90% cotton, 10% Metallic). The metallic effect is very subtle.
Red - 4 strands of DMC Perle Cotton, size 8. 2 strands of true red (color 321) and 2 strands of blue red (color 498)
Metallic - Guterman Metallic Effects Thread, color 71. This is a slightly thicker machine embroidery thread. There are only 55 yards on a spool, and this project required 3 spools.

Size E Embroidery hook.

Mary's Trim

I am HOOKED (HA, Ha) on crochet. Who knew you could have so much fun with a stick and string?

I adapted one of Bonnie Triola's trim designs over on Stitcher's Guild, using Black cotton yarn, red perle cotton, and a metallic embroidery thread. Love it, love it -- a nice vertical line to balance all those horizontal stripes.

And yes, I applied this trim entirely by machine. Karl would too, if he had to sew his own designs!

Maggie's Pattern and Construction


At last a classic Chanel-style pattern appeared in burda style 2/2010. Here is where I begin to part company with DS Mary. I'll never be the designer she is, but give me a good pattern and I'll happily trace it out. The other big difference? I'll be following Claire Shaeffer's instructions for a Chanel jacket, even down to quilting the lining to the tweed. I may even begin with a muslin. As for shortcuts? No fusible underlining for me. And machine stitching the hem? Quelle horreur!

Mary's Pattern and Construction


I am using Nancy Erickson's 1945, with a v-neck conversion, edges rounded to make trim application easier. This pattern is ALMOST perfect -- there is still a bit too much fabric in the chest area at the armscye, but it fits perfectly everywhere and is comfortable to wear as well.

I'm sewing for several fall events, and am really busy with my professional association. I have to do this quick.

The fabric is loosely woven, with great big chunky rovings woven across. Snag city. I am hard on my clothes, and I need this tweed to be supported with fusible interfacing. All body parts are fused, but not the sleeves. I serge-finished the edges before putting it together. If you don't tell anyone, I'll tell you a secret: I even machine stitched the hem on the sleeves and the bottom! GASP!

Maggie's Take on the Tweed


Several years ago Mary acquired way too much of this red and black silk tweed and gave some to me. It's been a challenge: how to work with the horizontal stripes when I am so short? how to trim it when it is so bold on its own? how to find a simple pattern that won't need a fba?

I did want to find a silk print for the lining but ended up with a perfect match in a cotton-silk sateen.

It starts with the fabric


The fabric was a gift from a generous and dear sewing friend. I always loved it, but knew I wouldn't make a matching suit, and was happy to give Maggie a big chunk for her stash (mostly to make room in my cedar chest). Both pieces have been aging for about 5 years, and who knows how long my friend had it!

I decided to line the jacket with the fabric salvaged from my going away dress from my 1982 wedding to DH. This is a red silk crepe with little upside-down checks in horizontal bands. It is not a perfect match, but I love the idea of using it in this jacket. There was enough to cut the body of the lining. The sleeve lining will be Ambiance.

Tuesday, September 14, 2010

SMACKDOWN!

One fabric. Twin sisters. Two patterns. Two trims. Two construction philosophies.

What will happen?

I've invited DS Maggie to join me on this blog to share our experiences with the black and red raw silk tweed!

Saturday, September 11, 2010

Jacket is done!


DH snapped a couple of pictures on our way out to the Virginia Symphony Orchestra opening concert.

Saturday, September 4, 2010

Button Choices


Crochet trim is done, Jacket is done. Which buttons should I use? The pearl buttons have a gold lion's head imprinted on them. To me, they say "spring and summer." The brown buttons are a bit more subtle, even though the gold is very bright. Here are detail shots: